May Your Life Be Like A Basket...Useful...Bountiful...Beautiful...

Basketmaster's Weavings is about my passions, much of which revolves around basket weaving. I weave with reed and I love teaching others to weave. Many of the patterns and styles that I show in the blog are geared to the beginning weaver, or even the brand new weaver. If you have been thinking about wanting to learn to weave, then this blog is for you. Throughout the blog and videos I take you step by step through each and every process of weaving. I want you to be successful in weaving the very first time you try. For the intermediate and advanced weaver, my wish is that you take ideas that I show, mix them up a bit, and incorporate them into your own beautiful creations.

Happy Weaving and Baskets of Blessings to all my visitors,

Nancy

You may find my YouTube Videos Here.

Listen to Basketmaster's Making our Home a Haven Podcast.


Sunday, January 31, 2010

Share a Basket Sunday - Pink Pot of Hope and future Susan G. Komen Fundraiser

Good Morning Friends,

Remember my post HERE about the Pink Pot of Hope. With every pattern sold, $1 is donated to the Susan G. Komen Fund.

Well my sweet friend Anne threw a basket weaving party a week ago and I wove this basket.
That is Darlene on the left and Anne on the right. What a fun evening of friendship, food and weaving. It doesn't get much better than this!


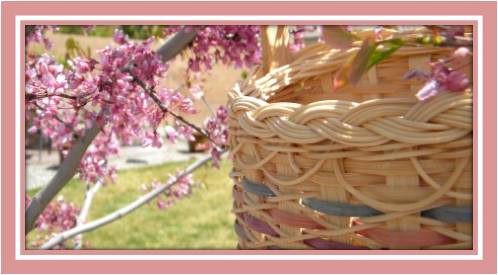
I want to show you the interesting base on this basket. It forms a footer by doing a 4 rod waling row. Now I've never ever said this on my blog before but I'm going to this time. I'm not going to tell you, at least not for some time how to do this great look on the base, I want you to go get the pattern and support the Susan G. Komen fund. Again go HERE to get details on where to get the pattern.

Here is my basket and I just am thrilled with the look. It's a larger basket than what I thought it looked in the picture. If you read Juliana's post I agree with her completely that pictures don't do it justice. Want to hear something I think is kind of neat. Julie and I live thousand's of miles apart and we didn't contact one another about weaving this basket, although I knew we've both had the pattern for some time, yet we wove this same basket within less than 24 hours of each other. How's that for being on the same page with other weavers! Ok, I find stuff like that cool.
I didn't have any round reed dyed in pink so I added a pink row above and below the 4 rod waling in the middle. Love the basket and love the pattern!!!


Now, onto the FUNDRAISING part of this post. This is FUN, IMPORTANT, and a MUST READ! (Yes, you’ll be reading about it again. Often! And, hopefully, on many different blogs!)

October is Breast Cancer Awareness Month, and I am hosting my first “THINK PINK” Raffle for the Susan G. Komen Foundation. Raffle tickets will be available online or, if you are in the area of one of our contributors, locally. 100% of the money raised from the raffle will go to the foundation, but I need your help to make this event successful.

I am encouraging all of my readers and fellow basket weavers, crafters, and scrapbookers to donate an item (or two!) to my “Think Pink” efforts. Whatever you can offer would be much appreciated! It does not have to be handmade. It can be any item that promotes “Think Pink” breast cancer awareness. My first contribution, of course, will be the basket pictured above! Remember…The theme is "Think Pink", so if you have a prize you would like to donate, please e-mail me basketmaster_nancy@yahoo.com . More prizes will mean more money for the foundation.

Many thanks to Anne @ When Pigs Fly for helping me in creating this benefit.

For those donating prizes, I'll put photos of them up on both my blog and my website, along with links to your blogs and/or websites. I'll also put the photos up in a prominent static place for viewing from September through December. This is a great way for you to promote your business or blog, and also my way of thanking you for your support for this cause.

The Susan G. Komen foundation is very near and dear to my heart as every woman on both sides of my family has experienced breast cancer including my own dear mother. It is something I take VERY seriously.

Thank you, again for reading this. Remember that 100% of all money raised will go to the Susan G. Komen Foundation for breast cancer research.

Please come back for details and updates on my “Think Pink” Breast Cancer Awareness event.

Have a Blessed Sunday,

Nancy

Saturday, January 30, 2010

Facebook

Hi Friends,
I've started a Fan Page on Facebook. I'm still learning the in's and out's of Facebook but I've been told this is the "thing to do" getting a fan page up. I'm laughing because I was messing around and actually got 3 fan pages up and gosh darn I can't figure out how to delete two of them. Then I signed up as a fan to my own page! Is that allowed? I'm laughing and I hope you are laughing with me in my computer faux pas. Here is the link to my fan page. I hope you will join me.
Blessings,
Nancy

Friday, January 29, 2010

Blog Award!


Woo Hoo I 've received an award!!!
Thanks Christine from Blossom Crafts for the Sunshine Blog Award. It made my day!

The rules for accepting the Sunshine Award are:
- Put the logo on your blog or within your post.
- Pass the award onto 12 bloggers.
- Link the nominees within your post.
- Let the nominees know they have received this award by commenting on their blog.
- Share the love and link to the person from whom you received this award.

I'm passing the award on to some awesome blogs.

Butterfly Kisses has some great scrapbooking and paper crafting inspiration.

U Create is a place for crafting ideas.

Handmade Business Blog for guidance and ideas on running a business with our handmade crafts.

Someday Crafts has all those great crafting ideas that you want to get around to doing someday.

Inspiring Creatings for great tutorials on things to create.

My Pink Stamper has lots of videos with instructing on how to create with my favorite scrapbooking tool, the Cricut.

Maya*Made has sewing projects that just make me happy.

Mom's the Word for her wonderful Christian homemaking blog.

Fireflies and Jellybeans for more great crafting ideas.

My Frugal Family has do it yourself ideas and crafts to help us keep costs down.

Skip to My Lou for her great crafting tutorials and recipes.
Tammy's Recipes for her great recipe site.
I hope you enjoy visiting and reading these blogs as much as I do.
Baskets of Blessings,
Nancy


Living a Minimalist Lifestyle and some Fun Blogs

Good Morning Friends,

I must confess, I don't read books like I use to. Instead I read blogs. Blogs have filled my need for books and for magazines for that matter. Every once in a while I run across one that is like a good story and I look forward to what will happen next. One such blog I enjoy is NATALIE. Natalie and her new husband Luke are such a sweet Christian couple enjoying life and young love. After being married 21+ years ourselves now and rather set in our ways, it is fun to read and enter into their lives and remember the freshness of young love and what it was like to have and plan your entire future ahead of you. Plus she takes some beautiful photography and has a creative bone in her body like me.

Another blog I recently ran across is miss minimalist. Her and her husband have taken a job overseas in the UK and I can completely relate to their downsizing. When we moved to Germany I had to do much the same (but not quite to her extent). miss minimalist also has guest bloggers who live a minimalist lifestyle. I don't know why but I find it fascinating that people can live with five or less pieces of furniture or live in a 10 x 15 foot apartment. I guess I really didn't realize people lived such a minimalist lifestyle by choice but I can understand and appreciate the benefits that it can have.

The care of all our "stuff" is something I've been thinking about for the past two or three years now. Every time we bring in more stuff there is more to store, more to dust, more to maintain etc. etc. etc. I really do like (love) my house. We have lived in this same house now over three years which is a long time for Mike and I. His job has moved us around quite a bit. I must say though that I hope we retire here and live the rest of our lives here because I'm quite happy. That said, after three years, we have accumulated and filled our space. With no plans on the horizon to move, this means it is time to go through things again. When we move it forces me to go through all we own and decluttering just naturally takes place.

It's been funny, not funny ha ha but funny interesting, I'll read a post from miss minimalist and then I've gone and purged something like the drawer in my nightstand, or our medicine cabinets, or a shelf in the closet. I could never live with just the very bare minimum, (I think an extra set of sheets is a necessity) but getting out some of the old and looking at the things we really use and enjoy has been a breath of fresh air lately.

One of the things about Mike and I and the kids is that we enjoy a LOT of different activities. I for example enjoy basket weaving, cooking and all things creative as well as gardening and camping. All these activities require "stuff". I'm trying to be inspired by miss minimalist and others like her who she interviews. I'm not going to strive to live with the very bare minimum, that's not my style, but I am going to strive living with only things we love and use. In going back to reading blogs vs. books and magazines, I must say that I'm rather proud of myself as even though last week I bought a couple books on fibromyalgia because of Emily, I haven't bought any books for myself since October when I got THIS book and I have let my magazine subscriptions expire and I only bought a couple before Christmas. Gosh I love to read, just add that to my list of hobbies.
Thank you, all you bloggers for fulfilling my need to read while yet helping to keep my home clutter free by reading about you on the computer and not in a book.

Do you have any special tips on how you handle all you accumulate?

Baskets of Blessings,

Nancy
This post links to:

Making your home sing Mondays

Thursday, January 28, 2010

Disclosure Policy

Dear Friends, Although I have not made any money from this blog, I have from time to time received product to review and I always have made sure to let you know that. With the laws as such, I am to not only let you know that, but I'm to have a disclosure policy as well so here it is. I will also say that my website over at www.basketmasterweavings.com is another story though as I currently have some affiliate links on it and I am in the process of developing some product that will be sold on it as well. It is still much a work in progress, but you can take a look if you like.
Have a wonderful evening,
Nancy


This policy is valid from 28 January 2010

This blog is a personal blog written and edited by me. For questions about this blog, please contact basketmaster_nancy@yahoo.com.

This blog accepts forms of cash advertising, sponsorship, paid insertions or other forms of compensation.

The compensation received may influence the advertising content, topics or posts made in this blog. That content, advertising space or post may not always be identified as paid or sponsored content.

The owner of this blog is compensated to provide opinion on products, services, websites and various other topics. Even though the owner of this blog receives compensation for her post or advertisements, she always gives her honest opinions, findings, beliefs, or experiences on those topics or products. The views and opinions expressed on this blog are purely the blogger's own. Any product claim, statistic, quote or other representation about a product or service should be verified with the manufacturer or provider.

This blog does not contain any content which might present a conflict of interest.

To get your own policy, go to http://www.disclosurepolicy.org

Ta-Da List


Good Morning Friends,
Do you ever feel like you make lists and just don't accomplish what you would like on that list? It can feel discouraging, I know. Lelan over at Good Gravy has designed a free printable Ta-Da! list. How fun is that! You can print it off HERE.

This way, when you complete the year of menu planning that I showed you yesterday you can check that off your list!!!

Baskets of Blessings,

Nancy

Wednesday, January 27, 2010

Menu Planning - Part 5 - a Year's Wort of Meals Video

Here I am wanting to do a month's worth of meals at one time, take a look at this short video of a mom doing and entire year of meal planning. Amazing. As for my family, we thrown in a leftover night once a week to clean out the refrigerator.
Please enjoy this. I did!
Baskets of blessings,
Nancy

Saturday, January 23, 2010

Happy Birthday Mike and an Update on Emily

Yesterday was my sweet Mike's birthday. One of the things he wanted was the food grinder attachment for our Kitchen aid mixer. He has been wanting to grind some of his own hamburger and sausage. Sometimes you can get chuck meat cheaper than hamburger so this could prove to be a good money saver to grind our own. Mike can be quite a cook when he has the time and finds it very relaxing.

I made him a carrot cake with cream cheese frosting. There is chopped walnuts in the frosting. The cake recipe came from a Taste of Home cookbook and is one of Mike's favorite cakes to eat. Happy birthday Honey, We love you!
In the top photo you can see Emily on the left. I wanted to give you an update on her shoulder pain that I had mentioned a while back. This pain has been quite a mystery and had started back in July. Everything had come back normal in the way of x-rays, lab tests and MRI. We've been trying a number of things to relieve her pain. After a 3 month wait she was finally able to see a doctor a pediatric rheumatology clinic. They have given her the diagnosis of fibromyalgia (a diagnosis for mystery pain) Actually she meets a lot of the fibromyalgia criteria and there was a lot of technical information given to us. Fibromyalgia can often start during adolescence and there is hope that she will grow out of it. We are praying she does. In the meantime she is in the beginning stages of trying various forms of treatment. (Diane, if you happen to read this post, thank you for all the advice you gave me prior to this. It really helped out at the doctor visit.) Poor Emily, as this pain has increased month by month and now radiates up into her head as well as down into her arms and legs. For the most part Emily is so good about it all, but there have been times she will come and just sit on my lap and cry. I am so glad she is getting her education online, a program through our public school. She goes into a classroom setting two days a week and does the remainder of her work at home. She can work for a couple of hours and then rest, get up and finish her studies for the day. On the days she goes into the classroom she can leave early due to her pain. They are flexible at the school so it is such a blessing. Please keep Emily in your prayers. She is only 14 and is such a sweet child. When things change I'll be sure to update all of you. We love you too Emily.
Have a blessed Sunday,
Nancy

Around the House Saturday - I'm starting my garden!


I'm weird. I say that because it is a happy day for me when I get to play in the dirt work in the garden! How many girls like to play in the dirt? Not just any ol' dirt. It has to be good rich garden soil.
On Jan 18th I started my summer garden indoors. I had written for the past two years in my garden journal to start my indoor seeds for the pepper plants sooner. It was great to see that Lowes had their seeds already out and on display. I also decided for the first time ever to try and grow tomatoes from seed. I've always bought my tomato plants, although small, already started. The last two years I thought the price of plants has really gone up. So, we'll see how it works starting them from seed. If this fails, I can always buy the plants around April.
I have a small guest bedroom with a window that faces the west so it gets a fair amount of sunlight. I brought in a small table and set it between the bed and window. It can always be moved it if family come to visit. So we'll see.... For tomatoes I've planted some Big Boy, Early and Often, and some Cherry tomatoes. For peppers I've planted Jalapenos, Green peppers, and a package that was titled Salsa Mix and it showed a variety of eight different peppers. Those plants will be a surprise!
Mmmmmm There is not much better in life than to get to play in the dirt. I can taste the good food now!
Baskets of Blessings,
Nancy

Friday, January 22, 2010

Feature a Friend Friday - Katherine and Steve from Dunbar Gardens


Dear Friends,

We have another stunningly beautiful woven heart basket today. Can't you tell Valentine's Day is just around the corner?
I'd like to introduce you to Katherine and Steve Lewis from Dunbar Gardens located in the beautiful state of Washington. Katherine made this incredible heart shaped basket from their red willow and some buff willow. This basket is a traditional French form – a cheese tray in a heart shape and in French is "coeur a fromage".

Katherine is a willow basketmaker and has a small farm where she and her husband Steve grow much of the willow used in her baskets. Katherine started weaving baskets about 19 years ago and eventually chose willow as her material. After taking a few willow basketry classes with visiting European teachers here in the US, she traveled to the UK in 2004 and the UK and France in 2006 to take willow basketmaking courses and learn more about willow basketry. Katherine teaches classes as well as selling her baskets; while Steve grows the willow and sells cuttings for those who want to grow their own.
Along with finding them at Dunbar Gardens, you can also see some of their beautiful work on their blog, Willow Basketmaker.

Thanks Katherine and Steve for letting us see your beautiful basket and letting us know about your work and willow gardens. Katherine, your weaving is so pretty. I hope everyone reading this will take a moment to check out your sites.

Baskets of Blessings,

Nancy

Thursday, January 21, 2010

Homemade Corn Tortillas

Last night for supper I tried my hand at making homemade tortillas.  I've NEVER made tortillas ever.  I've always purchased them premade.  Let me tell you they were stupid simple to make.  Seriously.  And they were yummy!

I've told you before I'm a home test cook for Cook's Illustrated magazine and have been doing this for over  a year now.  Cook's Illustrated tests and re-tests all their recipes and then they send them to select cooks around the US for us to make in the home kitchen.  Because of living in New Mexico I am sent quite a few Hispanic or Native American Indian recipes.  At least I'm getting to branch out with my cooking and try some new flavors.  I've never been asked to test something like gumbo from the south or New England clam chowder. 

A while back I was asked to test a recipe for  empanadas.  The recipe called for Harina.  I had to look up what Harina was and I didn't even know if our grocery store or Walmart carried it.  It is corn flour, masa, or really just ground up corn.  Funny how I've been shopping at my Walmart for 3 years now and I never ever noticed it on the shelf.  So after making the empanadas I had quite a bit of this corn flour left over and I didn't want it to just go to waste.  Remember I am eating from my pantry this month.  You can read my previous post about doing eating from my pantry HERE.
I decided that for dinner we would have a meatless dinner and I made black bean soup and tortillas. 
The tortilla recipe comes from the side of the Quaker corn flour package.

To make 12 -- 6" tortillas you use:
  • 2 cups Quaker Masa
  • 1 1/3 cup warm water
Directions:
  • Heat an ungreased skillet over high heat or a griddel from 475 to 500 degrees F.
  • Combine the masa and warm water and knead to blend well and form a ball.  Add a bit more water if necessary.
  • Divide dough and shape into 12 balls.  The diameter of the balls is about 1 1/2 inches.  Cover to prevent from drying.
  • Roll out or press each ball between 2 sheets wax paper to form a 6 inch circle.  (I must confess my circles were not very pretty but did get better as I did more.)  Carefully peel off wax paper.
  • Cook on ungreased skillet for 30 seconds or until lightly browned and edges begin to dry.  Turn tortilla and continue cooking for 1 minute.  Turn tortilla again and continue cooking for another 30 to 45 seconds or until desired doneness.
The kids put a little honey on their tortilla and a little butter with cinnamon sugar on it was delicious as well.  Mike and I tore ours into pieces and dipped the pieces into salsa.
What an easy thing to make.  It is so nice to know what exactly is going into our bodies.  I know if I need corn tortillas I will be making them because seriously, 2 ingredients!!!  Not only are they easy to make but they are super frugal.  I promise you they were every bit as good as the premade ones at the store.
Baskets of blessings,
Nancy

This post links to:
Please Visit Tammy's Recipes

Wednesday, January 20, 2010

Free Basket Weaving Pattern - Vanity Basket


Good morning Friends,
I have another  link to a beautiful basket pattern from Baskets of Joy.  I try to always remember to remind you to be sure and go print off their free monthly pattern because it is only up for a month.   If you don't have all the supplies you can get the kit from Baskets of Joy for $24.95.  This basket is titled a Vanity Basket and it has some beautiful leather handles.  I think it would look great in my husband's den.  HERE is the link for the pattern.
Baskets of Blessings,
Nancy

Tuesday, January 19, 2010

Technique Tip Tuesday - Balancing the Weight of your Basket

Good morning Friends,
In watching my YouTube videos you have heard me say as you weave each row, rotate your basket approximately 90 degrees when you start the next row.  This is with basic start-and-stop weaving (not continuous weaving).  The reason I say as you begin to weave the next row to give your basket a 90 degree turn is to do the starting and stopping in various areas of the basket, not all in the same area.  The location where you start-and-stop adds just a bit more weight to a basket and can add a very tiniest of bulge with the extra thickness of reed.  Your basket will sit better if the weight of the reed is distributed around all sides of the basket. 

There is one exception to the rule-of-thumb above.  When you are weaving a wall basket, you may do all you start-and-stops on the back side of the basket.  This way, the front side of your basket will be perfectly flat and pretty.  Any extra weight or even slight bulge will never be noticed on the back side of your basket.

One final note...As you do your rim, on the inside and outside of your basket, do make sure the overlap is in two different areas of your basket.  I usually place my overlap on opposite sides of the basket again to balance the weight and look.  If I know one side of my basket will be facing outward where most people will view it, I do not place the outside overlap on the viewing side of the basket.


In the photo above, where I have my arrows, is where I've overlapped the rim.  As you look at this basket head on like this, you do not notice the overlaps, as both the inside and the outside pieces of rim overlap in the direction to the BACK side of the basket.  This way, you do not see the cut end of my reed which happens to be 1/2" flat/oval.
This is just one more simple basket weaving technique to give your basket that high quality you're after vs. one that is rapidly mass produced.
One more thing.  This is my Kitchen Counter Basket and I have the free pattern for you HERE.
Happy Weaving Everyone,
Nancy

Monday, January 18, 2010

Free Heart Basket Weaving Pattern


First off, I've just got to say that all of you reading this blog are simply the best!  I mean it from the bottom of my heart.  I have a sweet reader, Jane, who sent me this link HERE to a free woven heart basket pattern found at The Basket Maker's Catalog.  Be sure to print off your pattern.  Take a close look at this basket.  Does it remind you of something else you could weave with this similar shape? 

Look below...


Turn my Christmas stocking on it's side with the point of the heel downward.  Isn't basket weaving fun?  With just little tweeks, we can change the look completely from a stocking to a heart.

Thank you so much Jane for sending us the link to the heart pattern.  Now Jane doesn't have a blog or a website for me to share with you, but her daughter does.  Her daughter is a wonderful painter so I'd like to direct you to The Art of Morgan Denise.  I hope you'll take a moment to view some of her beautiful work.
Happy Weaving Everyone,
Nancy

Sunday, January 17, 2010

A Heart Basket - Share A Basket Sunday


As we continue to get closer to Valentine's day, there is nothing more fun than to weave a heart shaped basket. I think on most all of my heart baskets I tend to put braided rims on them. In my mind heart shaped baskets and braided rims just go hand in hand. (I do want to insert a note here that I feel a heart shaped basket is a bit more tricky than a square basket just because there are more corners to go around. For you newbies just starting out, make a few square baskets before moving onto a heart shape. You will feel like you need more than two hands for the first couple of rows. Just be sure to use extra clothespins. Those are your extra hands.)
The handle on this is just #6 round reed. I cut three equal pieces and twisted them together. I did shave some off the end to taper the end a bit and inserted the handle into the basket.
Do any of you have some heart shaped baskets you've woven? I'd love to show them off.
Have a blessed Sunday.
Nancy
Sumo's Sweet Stuff
Photobucket


giveaways

Friday, January 15, 2010

John Toft Basketry - an amazing Woven Hot Air Balloon

Dear Friends,
I've received some lovely pictures from fellow basket weaver John Toft.  You may remember him from HERE.  Just take a look at this amazing woven balloon he did.  John informed me that The basket and balloon are woven in the English style of weaving, stake and strand.


John was first exposed to basket-making in elementary school in England. He took up the craft a few years before his retirement from teaching in 1998. His work focuses on pieces in the English style of basket making (stake and starnd) and others in North American styles. His English style baskets focus on sewing baskets as well as this fun piece, the hot air ballon. His North American style baskets focus on rib baskets and market baskets. His Etsy shop (http://www.johntoftbasketry.etsy.com/) uses sewing, rib and market baskets as category designators. He also has a number of vintage items on display and for sale there too.  You can also follow John's blog.

Thank you so much John for sharing your pictures with us.  Your work is truly amazing.
Baskets of blessings everyone,
Nancy

Thursday, January 14, 2010

How to make a Glitter Candle Holder and My Valentine Tablecloth

Dear Friends,
I've been busy sewing and crafting today. I think these fabrics are so pretty and two of them will become a Valentine apron for me. The third became a fun tablecloth for the family.


Next I began to work on the centerpiece for the table. Before I begin I must say that I was on a program showing my baskets and everyone on the program received a complementary sample of Beacon Glitter-It to try and review from Signature Crafts. I used Beacon's Glitter-It which was originally designed to coat the inside of clear Christmas ornaments and then put glitter in the ornament for a stunning look. I used it to coat a clear glass votive for a candle. Once the inside of the votive was coated with the Glitter-It which is very runny, I sprinkled different colors of glitter into the votive. I will tell you that this does dry fast so you need to be ready and move quickly.

Below is the finished candle votive. Glitter-It dries clear.

Finally my finished tablecloth and centerpiece. The kids love this!


Thank you Signature Crafts for letting me try your product. I think the results ended up being very pretty.


Photobucket

Wednesday, January 13, 2010

Do You Use Tumblr.com?

Hi Friends,
I was introduced to Tumblr about a year ago and thought this is just NOT for me.  I have my blog and I bookmark my pages.  I really just kind of forgot about it until about a month ago when it surfaced again with a number of both crafty women and on the problogging circut.  Tumblr promotes itself as being a great place to use for "Social Bookmarking things from the web".  I looked at it again and decided to give it a whirl.  It's not like blogging as you can't leave comments on other posts unless you change some HTML code.  I had a hard time figuring out how to tag my items so I could retrieve them later but I think I have that solved.  Anyway, I call it my "Happy Place of Inspiration."  Over this past month as I've run across posts that make me smile or inspire me in some way I've placed them in my Tumblr with links back to the original page to find the tutorial or recipe etc.  Anyway, it has been kind of cool.  I'm not looking for Tumblr followers here, but you can look at my page just to see what it is like if you want.  Here is my Tumblr page:  http://basketmastercreates.tumblr.com/ 
For those of you who use it, I know there must be a way to archive posts month by month because I've seen it done.  Perhaps you could direct me as to how to do this.
What my Tumblr pages remind me of is a wonderful magazine to sit down and flip through.  I love reading a good magazine with lovely photos and I feel like I have my very own personalized magazine here.
Baskets of Happiness Everyone.
Nancy

Monday, January 11, 2010

A Little Valentine's Day Bling


I'm in a paper crafting mood here and created this fun banner for Valentine's day.  I used my Cricut machine and cut the hearts out using the Doodlecharms cartridge and the letters using the Printing 101 cartridge.  It makes for an entrance into my kitchen that makes me smile.
Enjoy!
Nancy

The Girl Creativemonogram

Menu Planning - Part 4 A Great Grocery List

A great menu plan goes hand-in-hand with a great menu and grocery list. I have been using a notebook for this purpose.
Thank you Kate for providing a wonderful downloadable menu and grocery list. Visit Design Sponge for this great tutorial with free downloads for the list. This is a fun and practical project.
Baskets of Blessings,
Nancy

Sunday, January 10, 2010

A Nativity Scene Woven from Horsehair

Dear Friends,


Mickie Johnson and her husband are serving as Missionaries in Southern Chili and had posted this photo on their blog Our Mission To Chili along with other nativity sets they had seen. I found this one fascinating as it is woven from HORSEHAIR! If you remember I've shown a picture of a Horeshair basket HERE woven by Pamela Zimmerman. How fascinating to see an entire nativity set woven like this. The detail is incredible.


Thank you Mickie for giving me permission to post this on my blog. I am so glad to get to show it off to others. May God continue to bless you and your husband for the work you are both doing through Him.


Have a Blessed Sunday everyone,


Nancy

Saturday, January 9, 2010

Basket Weaving Printable Calendar Page and Basketmakers

Dear Friends,
I've mentioned Susi Nuss's free printable calendar pages before but with this being a brand new year I wanted to send you a quick reminder. You can get to it HERE. She will link to her Flicker pages and gives very easy directions for printing this out on a standard 8 1/2 x 11 piece of paper. Her photography is beautiful.
Susi is the owner/editor of the website Basketmakers. Basketmakers is chuck full of weaving information and is a wonderful resource. If you haven't stopped by that website be sure to do so. It is a place you will want to bookmark and return to again and again.
Baskets of blessings,
Nancy

Friday, January 8, 2010

Feature a Basketweaving Friend - Deb


Dear Friends,
It is always a happy e-mail day when I receive a note from a fellow basket weaver. (hint hint my e-mail is on my left side bar)
Today I want to introduce you to Deb who has been learning how to do the braided rim. The top photo shows a double braided rim and the bottom a basket with a single braid. These baskets were given one as a Christmas gift and one as a bridal shower gift. (I think the recipients of these baskets are pretty lucky if you as me!)
Deb has been weaving for 7 years now and enjoys many hobbies with basket weaving being one of them.
Thanks Deb for sending me the pictures and letting me share them. The baskets are beautiful!
Baskets of Blessings Everyone,
Nancy


Thursday, January 7, 2010

Free Basket Weaving Pattern - My YouTube Mini Muffin Basket

Remember friends you can make this basket following my step by step videos here on on my YouTube channel HERE.

Mini Muffin Basket
With Solid Bottom Base
Pattern Written by Nancy Jacobs ©2009

Finished Size 7 1/2”l x 4 1/4”w x 2 3/4” high
Materials Required
• 5/8” flat reed
• 3/8” flat reed
• 1/4” flat or flat/oval reed (I used dyed reed for this)
• #3 round reed

Directions
1. Cut stakes from 5/8” flat reed 7 pieces 14” long.
2. Cut stakes from 5/8” flat reed 4 pieces 18” long.
3. Cut fillers from 3/8” flat reed 3 pieces 15” long.
4. Lay out horizontally the 4 pieces 18” stakes rough side up.
5. Lay out horizontally the 3 filler pieces from 3/8” flat smooth side up.
6. Begin weaving with the center stake, a vertical 5/8” piece that is 14” long. With this center piece weave over the filler stakes and under the 5/8” pieces. These vertical pieces are also rough side up.
7. Weave in the remaining 6 vertical pieces that are 14” long. Three pieces woven on each side of the center stake. All weaving is a basic over/under weave.
8. Even up the base so that it measures close to 7 ½” x 4 ¼”.
9. Turn the basket upside down, smooth side up, and fold back the fillers cutting and tucking them in. Turn the basket over again so you are now back to rough side up.
10. Twine one row with #2 or #3 round reed to hold the shape of the base.
11. Upset the stakes.
12. Weave rows 1, 2, and 3 using 3/8” flat reed. Again, all weaving is basic over/under.
13. Weave row 4 with ¼” flat or flat/oval reed
14. Row 5 is 3/8” flat reed
15. Row 6 is ¼” flat or flat/oval reed
16. Twine around the basket with #2 or #3 round reed for 2 rows.
17. Tuck in all stakes.


Making the Rim
1. Cut 22 pieces of #2 or #3 round reed 22” long. The round reed is called “spokes”.
2. Insert one end of each piece of round reed up through the twining on each stake stake. Now take the other end of each piece of round reed, skip one stake to the right and insert it up through the twining 2 stakes to the right of the first end. Pull the ends up evenly to form a scallop. Do the same with each piece of round reed. Try to make your scallops the same size. All the loose ends of the round reed should be pointing upward and should be even. Each stake should have 2 ends of round reed coming up from the twining. The two ends of the round reed are now worked together as one and are called a “pair of spokes”.
3. First step. Take any pair of spokes and go behind the pair to the right and out to the front of the basket. Repeat this step around the basket. You will have one set remaining. Push the beginning set up slightly and take the last pair behind the beginning pair and out to the front. Snug the first row of the braid to the basket, making sure that the round reeds are not twisted.
4. Second step. Take any pair of spokes and go over the set of spokes to the right and to the inside of the basket. Again snug this row and make sure the round reed is not twisted.
5. Third step. This is exactly the same as the First Step.
6. Fourth step. This is exactly the same as the Second Step. It is the third and fourth steps that give a double braid appearance.
7. Let the basket dry and then trim the ends. This will prevent one of the ends from accidentally getting cut too short and popping out.

To make a bow, cut a 12” piece of ¼” reed and begin by inserting under the center stake horizontally. Center up the ends. Loop the ends over and insert down under the next row of weaving. Trim to desired length.

This has always been one of my favorite baskets to weave. It is the perfect size for 6 mini muffins or 2 coffee cups with a small package of gourmet coffee. It makes a beautiful gift.
Also, be sure to visit my blog at www.basketmasterweavings.blogspot.com or my website at www.basketmasterweavings.com I’d love to see a picture of your finished basket!
Enjoy.... Nancy

Wednesday, January 6, 2010

Feature a Basketweaving Friend - Nita

Dear Friends,
I'd like to introduce you to Nita who e-mailed me with these beautiful photos. Nita started weaving in 1988 and had only ONE class! After that she got a book and was off weaving on her own. Just look at the variety of beautiful baskets.
In the photo below I want to call your attention to the basket with the steer head. That is a coiled basket with round reed and raffia. Beautiful!

Thank you so much Nita for letting me share your photos with everyone. We all love the inspiration you have given us.
Baskets of Blessings to you all,
Nancy


Grab a cup of coffee and take time to enjoy some posts from the past

Affiliate Disclosure Statement

Some of the links/codes on this blog are affiliate links, which means if you chose to make a purchase using my links, I will earn a commission. This commission comes at no additional cost to you. I recommend these products because I have found them to be helpful and useful, not because of the small commissions I make. Every product I recommend, I use myself.