Dear Friends,
I've left this site quiet for a long time. I don't expect it to regain it's activity but I do want to let you know where I'm at and what I'm doing these days.
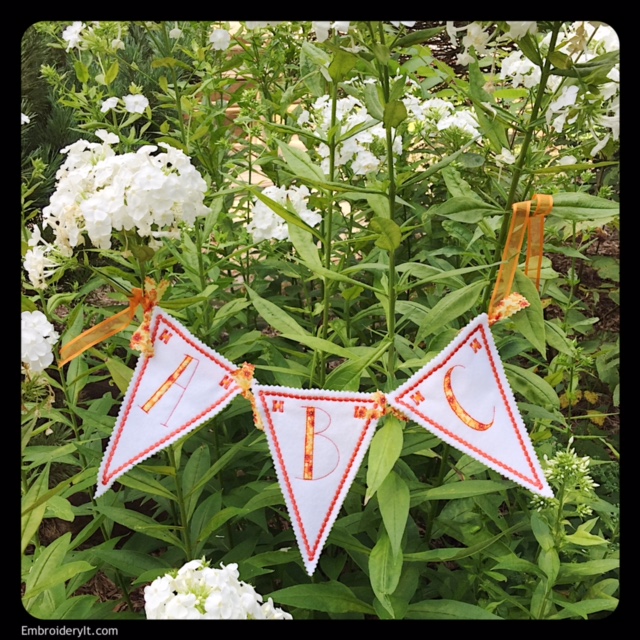
I've been deep into machine embroidery as well as digitizing embroidery designs. That is my latest passion. Being creative is how God made me so I'm truly enjoying this. If you do machine embroidery or know someone who does, I want to let you know I'm releasing a free alphabet letter each week. The letter A has been available for a few days and will be removed tomorrow, Wednesday night and will be replaced with the next letter.
Even though this site has been quiet, I'm still getting comments and e-mails from this blog so I guess I will post a rare notice here in hopes to direct any of you to my current website
www.embroideryit.com Embroidery It is where I am blogging and where you will get all the latest information on what is happening in the studio, aka spare room in the basement. There is no basket weaving on that site though :-(
For a limited time I am offering the Banner Alphabet "A" as a free embroidery design. It will be available for about 1 week and then I will replace it with a new letter. Here on this blog site, I'm letting you know it will be available only until Wednesday night, tomorrow night so grab it quick! Follow the directions below on how to get it as well as the rest of the free alphabet letters as they come out. This will be your only notice on this blog about the banner alphabet. My newsletter or website will keep you up-to-date with the remainder of the letters.
I am doing this instead of having sales as I feel this is a fair way to offer quality designs to everyone. Quite frankly, I hate purchasing something and then it go on sale a week later. That grates me. So, I want you to know to grab it free at the beginning and once it is removed from the free section, it will be offered for sale.
For those of you who receive my newsletter, you learned of this several days ago. If you haven't signed up for my newsletter, consider doing so. It will keep you up-to-date when I have new and noteworthy information to share.
The newsletter subscription is on my
Embroidery It website.
Now, for the banner alphabet...You will need a 5 x 7 hoop for most of the letters that will be offered. There are a few letters that will fit into a 4 x 4 hoop, but most extend beyond the edges so a 5 x 7 hoop is needed. It is available in PES format. The final stitches are the buttonholes. Your machine will automatically stop before stitching them so you may use these letters as an applique and just leave the buttonholes off.

To download the design, go to the "Home" page and scroll to the bottom. There you will see the link. Click on the link and then save the ZIP file.
I hope you all enjoy!!!
Embroidery Blessings and for those of you who e-mail me and send me pictures of your baskets, Happy Weaving,
Nancy