May Your Life Be Like A Basket...Useful...Bountiful...Beautiful...

Basketmaster's Weavings is about my passions, much of which revolves around basket weaving. I weave with reed and I love teaching others to weave. Many of the patterns and styles that I show in the blog are geared to the beginning weaver, or even the brand new weaver. If you have been thinking about wanting to learn to weave, then this blog is for you. Throughout the blog and videos I take you step by step through each and every process of weaving. I want you to be successful in weaving the very first time you try. For the intermediate and advanced weaver, my wish is that you take ideas that I show, mix them up a bit, and incorporate them into your own beautiful creations.

Happy Weaving and Baskets of Blessings to all my visitors,

Nancy

You may find my YouTube Videos Here.

Listen to Basketmaster's Making our Home a Haven Podcast.


Showing posts with label Free Basket Pattern 4 You. Show all posts

Sunday, May 9, 2010

Free Basket Weaving Pattern from Me to You - Happy Mother's Day

Dear Friends,
Happy Mother's Day to all my mommy readers. I hope you are all being spoiled today. I have no idea what is in store for me but I'll be sure to let you know.
I haven't shared a free basket pattern with you in some time and so I thought today would be fitting.
Have a beautiful and blessed Sunday,
Nancy

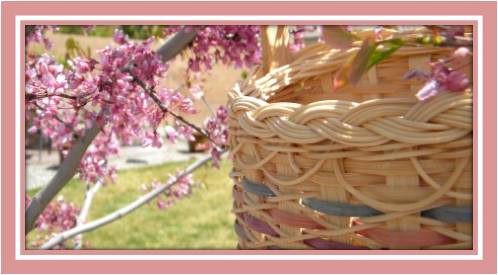
Elegant Mother’s Day BasketPattern Written by Nancy Jacobs

Finished Size: 9” x 4 1/2” not including handle height.

Materials Required:
5/8” flat reed
1/2” flat reed - spokes
3/8” flat reed
3/8” flat/oval reed
11/64” flat or flat/oval reed
1/4” flat or flat/oval colored reed
#2 or #3 round reed
Seagrass
3 yards wire edged ribbon
6” thin wire (i.e. 22 gauge)
Floral embellishment

Procedure:
1. From 1/2” flat reed cut 11 pieces 23” long and 1 piece 63” long.
2. Mark the centers of these pieces on the rough side with a pencil
3. Lay out the 63” piece and 5 of the 23” pieces, rough side up, matching the centers, and to look like the spokes on a bicycle wheel. These become the spokes of the basket.
4. Take 2 long pieces of #2 or #3 round reed and begin twining around the spokes. Continue twining tightly around the base until it measures 6 inches in diameter.
5. Lay out remaining 6 pieces of 1/2” flat reed in the spaces between the woven spokes, rough side up, matching center pencil marks.
6. Continue twining, incorporating these new spokes. Twine until the base size reaches 9”.
7. Upset the spokes and twine for 2 more rows. The rough side of the reed is on the inside of the basket.
8. Using a basic over/under weave, weave the following:
Rows 1 and 2 - 3/8” flat
Row 3 - 1/4” flat or flat oval colored
Rows 4 and 5 - 3/8” flat
Row 6 - 5/8” flat
Rows 7 and 8 - 3/8” flat
Row 9 - 1/4” flat or flat/oval colored
Row 10 - 3/8” flat
Row 11 – 1/4” flat or flat/oval
9. Cut off the spokes that are on the inside of the basket flush with the top row of weaving. DO NOT CUT OFF THE HANDLES EVEN IF THEY ARE ON THE INSIDE OF THE BASKET.
10. Loop over the 63” reed to the opposite side of the basket and insert each side into the weaving creating the desired height to create the handle.
11. Cut and tuck in remaining spokes to the inside of the basket.
12. Place a piece of 3/8” flat/oval reed on the inside and outside of the top row of weaving.
13. Insert seagrass between the two pieces of 3/8” flat/oval reed. This will hide where the spokes were cut and tucked.
14. Lash on rim with 11/64” flat or flat/oval reed.
15. Wrap handle with 11/64” flat or flat/oval reed. Insert a strip of 1/4” colored reed along the center of the handle. Allow the color to show through by occasionally wrapping the 11/64” both under and over the colored reed.
16. If desired, stain basket at this time. When basket is dry, remove row #6 by cutting out the piece of 5/8” flat reed.
17. 17. Replace row #6 with wire ribbon. Center ribbon on the back of the basket and weave over/under to the front. Make a bow and wire in place. Embellish with flowers if desired.
18. Enjoy your basket!!!

This Post Links To these Fun Blogs:
Under The Table and Dreaming
Make It From Scratch
Somewhat Simple
Along for the Ride
Tatertots and Jello

Thursday, January 7, 2010

Free Basket Weaving Pattern - My YouTube Mini Muffin Basket

Remember friends you can make this basket following my step by step videos here on on my YouTube channel HERE.

Mini Muffin Basket
With Solid Bottom Base
Pattern Written by Nancy Jacobs ©2009

Finished Size 7 1/2”l x 4 1/4”w x 2 3/4” high
Materials Required
• 5/8” flat reed
• 3/8” flat reed
• 1/4” flat or flat/oval reed (I used dyed reed for this)
• #3 round reed

Directions
1. Cut stakes from 5/8” flat reed 7 pieces 14” long.
2. Cut stakes from 5/8” flat reed 4 pieces 18” long.
3. Cut fillers from 3/8” flat reed 3 pieces 15” long.
4. Lay out horizontally the 4 pieces 18” stakes rough side up.
5. Lay out horizontally the 3 filler pieces from 3/8” flat smooth side up.
6. Begin weaving with the center stake, a vertical 5/8” piece that is 14” long. With this center piece weave over the filler stakes and under the 5/8” pieces. These vertical pieces are also rough side up.
7. Weave in the remaining 6 vertical pieces that are 14” long. Three pieces woven on each side of the center stake. All weaving is a basic over/under weave.
8. Even up the base so that it measures close to 7 ½” x 4 ¼”.
9. Turn the basket upside down, smooth side up, and fold back the fillers cutting and tucking them in. Turn the basket over again so you are now back to rough side up.
10. Twine one row with #2 or #3 round reed to hold the shape of the base.
11. Upset the stakes.
12. Weave rows 1, 2, and 3 using 3/8” flat reed. Again, all weaving is basic over/under.
13. Weave row 4 with ¼” flat or flat/oval reed
14. Row 5 is 3/8” flat reed
15. Row 6 is ¼” flat or flat/oval reed
16. Twine around the basket with #2 or #3 round reed for 2 rows.
17. Tuck in all stakes.


Making the Rim
1. Cut 22 pieces of #2 or #3 round reed 22” long. The round reed is called “spokes”.
2. Insert one end of each piece of round reed up through the twining on each stake stake. Now take the other end of each piece of round reed, skip one stake to the right and insert it up through the twining 2 stakes to the right of the first end. Pull the ends up evenly to form a scallop. Do the same with each piece of round reed. Try to make your scallops the same size. All the loose ends of the round reed should be pointing upward and should be even. Each stake should have 2 ends of round reed coming up from the twining. The two ends of the round reed are now worked together as one and are called a “pair of spokes”.
3. First step. Take any pair of spokes and go behind the pair to the right and out to the front of the basket. Repeat this step around the basket. You will have one set remaining. Push the beginning set up slightly and take the last pair behind the beginning pair and out to the front. Snug the first row of the braid to the basket, making sure that the round reeds are not twisted.
4. Second step. Take any pair of spokes and go over the set of spokes to the right and to the inside of the basket. Again snug this row and make sure the round reed is not twisted.
5. Third step. This is exactly the same as the First Step.
6. Fourth step. This is exactly the same as the Second Step. It is the third and fourth steps that give a double braid appearance.
7. Let the basket dry and then trim the ends. This will prevent one of the ends from accidentally getting cut too short and popping out.

To make a bow, cut a 12” piece of ¼” reed and begin by inserting under the center stake horizontally. Center up the ends. Loop the ends over and insert down under the next row of weaving. Trim to desired length.

This has always been one of my favorite baskets to weave. It is the perfect size for 6 mini muffins or 2 coffee cups with a small package of gourmet coffee. It makes a beautiful gift.
Also, be sure to visit my blog at www.basketmasterweavings.blogspot.com or my website at www.basketmasterweavings.com I’d love to see a picture of your finished basket!
Enjoy.... Nancy

Friday, October 9, 2009

I Was Featured on FaveCrafts!!!

Dear Friends,
I am so thrilled today as I have been featured on FaveCrafts! They have published one of my basket patterns HERE. Also, they wrote a very nice blog post about me HERE. This is really exciting for me as it is my first publication feature!

Be sure to visit FaveCrafts and get your free basket weaving pattern. While you're there, take look around their site. They have some amazing crafters and tutorials on almost every craft imaginable. I was their first basket weaving tutorial!
I've got to be careful because I'm getting a seriously big head here.
Thanks for letting me brag and share my enthusiasm with all of you and a huge THANK YOU to FaveCrafts.

Happy Weaving,
Nancy

Wednesday, October 7, 2009

Free Basket Weaving Pattern 4 U - My YouTube Berry Basket

Dear Friends,
Here is the written pattern for the berry basket. You can do this basket by following step-by-step through the videos. If you look on the left hand sidebar of my blog, scroll down to my "Learn to Weave" video section. Look for the videos for BERRY BASKET. They start with the one for "Round Basket Base - Berry Basket". Then just go down the video list in order to weave this basket with the videos.

Berry Basket
Pattern Written by Nancy Jacobs

Supplies:
  • 5/8" flat reed
  • 3/8" flat reed
  • 1/4" flat reed
  • 11/64" flat reed
  • 1/2" flat/oval reed
  • 11/64" flat/oval reed
  • #3 round reed
  • Seagrass

Directions

  1. Cut your spokes from 5/8" flat reed. Cut 7 spokes at 18" and 1 spoke at 50"(The 50" piece will form your handle). Mark the centers of your spokes on the rough side.
  2. With rough sides up, lay the 50" piece on the bottom and three of the 18" pieces matching the centers to start the base. It should look like the spokes on a bicycle wheel. Space them apart evenly.
  3. Twine with #3 round reed until the diameter of the base is 5 1/2". Incorporate the four remaining spokes and twine for a couple more rows or until the base is 6".
  4. Upset the spokes.
  5. Using basic over-under weaving for the sides of the basket weave in the following order: Rows 1 and 2 weave 3/8" flat. Rows 3 through 11 weave 11/64" flat (I used dyed reed). Rows 12 through 14 weave 3/8" flat.
  6. ATTENTION, PLEASE READ BEFORE GOING ANY FURTHER. DO NOT CUT YOUR 50" PIECE HERE. It is time to cut and tuck your spokes. You will be cutting the inside spokes and tucking the outside spokes. Even if your handle ended up as an inside spoke, do NOT cut it. Just cut and tuck the other short spokes.
  7. Cut a handle filler from 5/8" flat reed 15" long
  8. Tuck the handles into the basket on the opposite side to your desired length. They will loop over each other to make a double thickness. Sandwich the handle filler between the 50" pieces to again increase the strength of the handle. This now makes a triple thickness for the handle.
  9. Position a rim from 1/2" flat/oval reed on the inside and outside of your top row of weaving. Sandwich a piece of seagrass between the rim pieces. You may taper the ends of the 1/2" flat/oval if desired to decrease the thickness where it overlaps.
  10. Lash the rim in place with 11/64" flat/oval reed.
  11. Wrap the handle with 1/4" flat reed. You may do a decorative treatment with matching dyed reed as desired.
  12. Trim or singe the hairs of the basket.

I hope you enjoy this basket and give it a try, especially if you are new to weaving. If you are a new weaver, this basket is just for you! Follow along with the YouTube videos and it should be a snap. Please let me know when you have woven this or other baskets as I'd love to stop by your blog and see them!
Happy Weaving and Baskets of Blessings,
Nancy

Tuesday, June 9, 2009

Free Pattern 4 U--My YouTube Recipe Basket


Dear Friends,

Here is the pattern for this basket in the photo above. This is the basket that I wove throughout my YouTube videos, videos #3 through #12. Please feel free to print off this pattern and weave the basket or print as many copies as you wish and teach this basket to others. If you teach it, would you be so kind to let others know about me and my blog. Many thanks!!! This basket is a beginner level basket designed for the basket weaving newbie.


Recipe Basket
Pattern written by Nancy Jacobs

Supplies:
  • 5/8" flat reed

  • 3/8" flat reed
  • 1/4" flat reed

  • 11/64" flat reed

  • 3/8" flat/oval reed

  • #3 round reed

  • Seagrass

Directions:

  1. Cut your stakes from 5/8" flat reed. Cut 5 stakes at 18" and cut 7 stakes at 15".
  2. Lay out the 18" stakes horizontally.

  3. Weave in the 7 remaining 15" stakes vertically doing a basic over-under weave. Base should measure 7" x 5" and everything should be centered up.

  4. Twine one row with #3 round reed as a keeper row.

  5. Upset the stakes.

  6. Using basic over-under weaving for the sides of the basket weave in the following order: Rows 1, 2, and 3 weave 3/8" flat. Rows 4, 5, and 6 weave 11/64" flat (I used dyed reed). Rows 7 and 8 weave 3/8" flat. Row 9 weave 1/4" flat.

  7. Cut your inside stakes and tuck in your outside stakes.

  8. Position a rim from 3/8" flat/oval reed on the inside and outside of your top row of weaving. Sandwich a piece of seagrass between the rim pieces.

  9. Lash rim in place with 11/64" flat reed.

  10. Trim or singe the hairs and embellish as desired.

I decided my basket would be a recipe basket to hold all the recipes that I tear out of magazines or the newspaper that I want to try. I decorated my little rolling pin with brown and white gingham ribbon and cut out the word "Recipe" using my Cricut cutter with the "Base Camp" cartridge. My rolling pin is wired to the basket.

I hope you enjoy this basket and give it a try, especially if you are new to weaving. If you are a new weaver, this basket is just for you! Follow along with the YouTube videos and it should be a snap. Please let me know when you have woven this or other baskets as I'd love to stop by your blog and see them!

Happy Weaving and Baskets of Blessings,

Nancy

Wednesday, March 4, 2009

100th Post and a Freebie Pattern for All!

I can't believe I already have posted 100 times. (actually, this is post #101) My March Newsletter was post #100. I think that it is time for me to share a pattern with all of you. Please feel free to weave this and share it with others in your classes, guilds, or on your blogs. All I ask is that you please give me the credit for writing it and link your friends back to my blog. Oh, also please post a comment to just say "hi". I like to hear from all who are reading my blog.
Thanks and Baskets of Blessings to all of you!
Nancy

Kitchen Counter Basket
Pattern Written by Nancy Jacobs

Finished Size is approx. 11”l x 5”w x 7” h

Materials Required:
5/8” flat reed
3/8” flat reed
3/8” or 1/2” flat/oval reed
11/64” flat or flat/oval
#2 or #3 round reed
Seagrass

Steps:
Cut stakes from 5/8” flat reed 5 pieces 27” long.
Cut stakes from 5/8” flat reed 9 pieces 24” long.
Cut filler stakes from 3/8” flat reed 4 pieces 19” long.
Lay 5 stakes—27” long horizontally, rough side up.
Lay the 4 filler 3/8” stakes between the 27” stakes, smooth side up.
Weave vertically the 9 stakes rough side up from 5/8” flat in an over under weave. The stakes on the far left and right should be woven UNDER the filler stakes. Base is to measure 11” x 5”. Square everything up.
Turn the basket over and fold back the filler stakes and insert ends under weaving.
Turn basket back over and twine one row of #2 or #3 round reed to keep the base in place.
Upset the stakes.
Weave with an over/under weave with 3/8” flat reed for 5 rows or until a height of approx 2”. Colored reed can be woven in here if desired.
Now you will begin increasing the basket on three sides. Begin your weaving on the stake at the farthest left on one of the long sides. Bend the weaver back on its self and hide the end in the weaving. Weave around the front, one end of the basket and the back of the basket ending at the stake on the farthest right. Again bend the weaver back on its self and tuck the end in the weaving.
On the next row begin with the stake, second to the end and do the same ending around on the other side second stake from the right.
Continue increasing the weaving around the basket until your last row is just across one short end of the basket.
Twine for 2 rows around the top of the basket with #2 or #3 round reed.
Tuck in all stakes, hiding the ends under the weavers.
Place a rim of 3/8” or 1/2” flat/oval on the inside and the outside of the two rows of twining.
Place a row of seagrass between the rims and lash rims in place using 11/64 flat or flat/oval.
Trim or singe the hairs of your basket and ENJOY!

I think this basket is great for the kitchen counter. It is long enough to hold business size envelopes, pencils, stamps, mail or just any the things that tend to collect on your counter.

Grab a cup of coffee and take time to enjoy some posts from the past

Affiliate Disclosure Statement

Some of the links/codes on this blog are affiliate links, which means if you chose to make a purchase using my links, I will earn a commission. This commission comes at no additional cost to you. I recommend these products because I have found them to be helpful and useful, not because of the small commissions I make. Every product I recommend, I use myself.